More Drivetrain Pondering

Still no solution on the drivetrain.

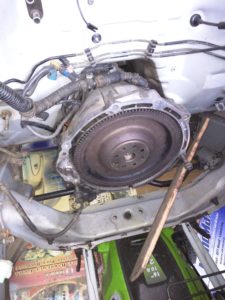
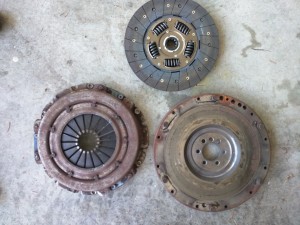
With this being a custom build (ie this transmission has never been done before) I’m still struggling with the connection of the motor to the flywheel.  I’ve done a lot of reading and really thought about doing it myself, but I want it to work and not destroy my bearings/motor/transmission etc.

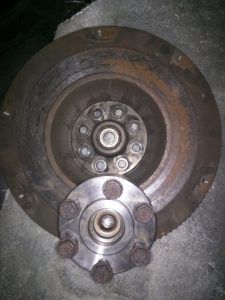
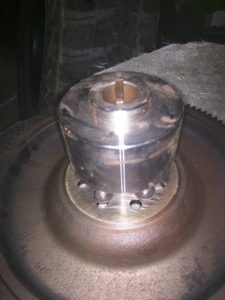
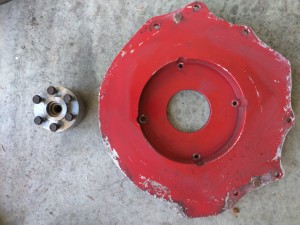
I have no problem making the bell-housing adaptor, but the coupling is a problem.  I almost sprung on a Taper-lock as some before me have suggested, but the precision that is needed to adapt it for my use scared me, and getting a machinist aboard isn’t something I really wanted to do.

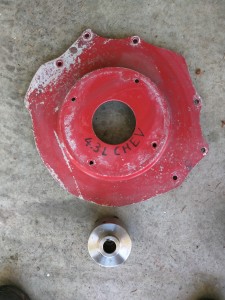
I went to Canev (http://www.canev.com/index.php) where Randy is one of the most helpful guys I’ve ever met and tried to adapt an existing coupling but none fit.

Looks like my only choice at this time is to ship my entire transmission to EVWest (http://evwest.com/catalog/) and have them custom build it for me. This will be in the range of $1600-2000 CAD.  At least then it’ll be done right.

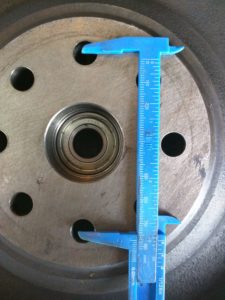
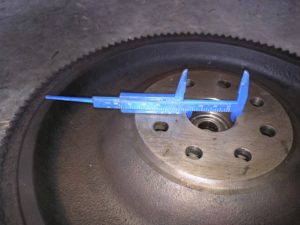
Excuse the ghetto caliper.  My precise one wasn’t available at the time.

flywheel-measurement-2 flywheel-measurement-3 flywheel-measurement

Fibreglassing

In my infinite wisdom I bit off a bit more than I can chew.

Years ago I fixed up the fibreglass of a boat and it went well… thought I could do a bigger project this time.

I decided that I had a few problems.  I didn’t want the spare tire on the back of the car, but the look without it was terrible.  The bumper had a divot in it and the rear door was in bad shape. The previous owner had backed into a wall with the tire, and when you left it on you couldn’t really tell the damage.  It had dented the door pretty bad and it needed to be fixed up. So why not fibreglass the whole thing to look like the tire wasn’t there ever!

I’ve only just begun and learned a few things I did wrong (there are many) but I’m determined to make this work!

rear-bumper-fibreglassing rear-door-fibreglassing-2 rear-door-fibreglassing-2 rear-door-fibreglassing

Measurements for the Drivetrain

I’ve been tossing around how to couple the motor to the transmission.  I’ve decided that I want a clutch so my wife can drive the car, and that’s about it. There is nothing I can find off the shelf so I have to build it.

I put the clutch back together and took some measurements…  I also have the parts from the S10, so I’ve been trying to explain this to a buddy who is a shop teacher at a high school… so I had some other pictures.  Too bad the S10 and the Vitara weren’t compatible!

drivetrain-ev-clutch-installed 2016-11-02-04-41-35 2016-11-02-04-41-59

Summer wasn’t too kind

Well summer was tough.  We went on 2 giant road trips and did not spend a lot of time at home. Needless to say not much work has been done.

I have sold most of the parts from the S10 and Vitara (parts I don’t need) so that’s a plus and now it’s time to get back to work!  Onwards and Upwards!  PS… I’ll get better at taking pictures!

Adaptor Plate Saga

So the Adaptor Plate… this is a problem.  I’ve been asking around for quite some time to find a place.  I found one online, but a trusted friend has told me not to deal with that company.

I’ve been referred to a place in Washington through SEVA (Seattle Electric Vehicle Association) and so I’ve got to check that out.  I’ve also been referred to a place out of California who does this all the time.  You’d think that is the logical choice, but they need a transmission to get the measurements and I’m in Vancouver, BC.  It’s $200 to ship a transmission…  That brings the cost for everything close to $2000 USD.  More than I was hoping.

I then came across this thread: http://www.diyelectriccar.com/forums/showthread.php/want-build-adaptor-plate-myself-looking-52905.html  How hard can it be?  If I don’t find someone to do it for me soon… we may attempt this.  I do need this done shortly though (as I work on the “looks” of the car) so that I’m not waiting on the motor come October when I need to start assembling electric parts.

Bondo and Fibreglass

Now for the part of the job I hate.

The perfectionist in me is very good at Bondo and fibreglass (I re-built a boat a few years ago) but man is it a terrible job.

The bumpers and cracked in a few spots and need to be strengthened and there are the inevitable dents and dings.  The Vitrara is in great shape otherwise and only has about 6 dings that need to be fixed… but it’s still a bit of work.  The goal is to get the paint and interior done by the end of Sept so that all is left is installation of batteries and electric parts to get done by the end of December.  I’ve been told this is the easy part!

To add insult to this injury, I’m also removing tire from the back door as I don’t need the weight or the spare.  This means that I need to take the “bump” out of the rear bumper and make it look like a single piece.  That’s the next thing to tackle!  Fun :-S

Wrecker Visit

Well I had a day off work so off to the wrecker I went!

Picked up a bunch of parts for my truck (which took a total of 2 weekends to install), and I ended up with seats for the Vitara.  The seats in that car were a mess.  300+ km on them and not well taken care of.  They needed to go.  I was looking for (and found) a set of Jeep Grand Cherokee seats from a 1998 Jeep.  Dark gray to match and full power and heated seats!  Great find!

Also found head rests to replace as they didn’t come with the Vitara.  Also picked up a battery so that I can move things like windows on the Vitara as I’m working on it.  Very difficult otherwise!

***I’m learning as I write this I need more pictures!***

Batteries… the endless question

So now that the Vitara is in the “work” bay I’ve had the opportunity to take some measurements and start the planning in my head.

Although a Leaf pack is very functional and easy to work with, they are very “hot” items right now.  A single wrecked leaf is going for anywhere between $3000 and $5000 USD on Autobidmaster.  That’s a bit more than I want to pay for a battery pack, not to mention I want 1.5 packs which involves buying 2 cars!  Yes I can sell parts and make some of the money back, but after doing that with the S10 I’m less than excited to do that again, let alone twice.

In terms of battery packs I’m looking for somewhere in the range of 30 KWh at 144 Volts.  I have all the parts for this and the 144 Volts will allow me to upgrade to an AC motor in the future if I so choose.  My search for batteries lead me to the Chevy Volt.  These packs are a little more volatile and difficult to work with than the Leaf cells, but they come in 48 Volt cells with included heater and cooling system.  Not a bad deal if you ask me!  I would need just under 2 of them (leaving me 1 48 volt pack left after) and they are $1,800 USD at a wrecker just across the border (less traveling for me).  These cells also come with wiring for a BMS system.  It’ll need to be a large and expensive BMS, but easy to connect.  Seems like a good plan so far…

***Problem… with the cooling system these packs are big, and take up a lot of space.  This means I can find room for 2/3 not problem, but I have more cells to find space for.  This is going to be a challenge***

Soon I’m going to need to get my hands on a pack to get exact measurements.  There is a really good thread on these cells here: http://www.diyelectriccar.com/forums/showthread.php/2012-chevy-volt-battery-93101.html  It’s a huge thread but there are a lot of details in there.

Onwards!

Dismantling of the S10 is complete!

Well a wedding stalled the process for a few months, but I now have all the parts out of the S10.  It was about 5 days of tracing wires, and trying to figure out why things were hooked up the way they were.  I still have questions, but the huge amount of pictures I took and notes on what wires go where have lead me to believe that one day I’ll be able to put the Vitara back together.

One thing that amazed me is how everything fits together.  When you’re used to working on Gas motors as I am the size of the electric motor is so small!  And it mounts up in such a simple manner!  All that space you save is taken up by batteries though so don’t get too excited!

I’ve noticed one thing about DIY’ers… they tend to cut corners.  I bet I will as well but when I opened up the electrical boxes there were wires EVERYWHERE!  I get that happens, but there needs to be some method to the madness.  No colour coding, not notes makes it very difficult.  Also, once a wire is outside the electrical box there was nothing covering them up.  In modern cars they all use convoluted tubing (or wire sleeves) so that it looks neat and tidy but also protects the wires.  I know I will go that route… the previous owner did not.

Once all the parts were out and I listed everything for sale, I actually sold a large part of the truck.  So much that I actually had to pay someone $100 to take the S10 away.  I know I should have taken a picture but I completely forgot.  Let’s put it this way, there were no doors, windows or axles on the truck!  Still some left over but made back close to $2000 on the cost of the S10 so that is a great accomplishment!

Now that the S10 is done I can move the Vitara into the working bay and get it all underway!  Next step is to get the outside of the Vitara prepped for paint and finish the interior.

IMG_20160410_154514.603 IMG_20160415_172458.234 IMG_20160415_184921.370 IMG_20160423_163857.801

2016-06-05 00.08.32 2016-06-05 00.09.10 2016-06-05 00.08.23

DC-DC Fried :-(

Well, when I got the S10, I put as much of a charge as I could on the Lead pack to test some parts.  Bad news… something went pop!

Turns out it was the DC-DC converter to charge the 12 volt system. There was a leak in the canopy and water got onto the circuit board melting a hole right through.  Maybe I’ll try to fix it in the future.  The good news is everything else works!

2016-03-07 21.52.38 2016-03-07 00.04.12 2016-03-07 00.04.392016-03-07 00.04.492016-03-07 00.04.57